How to Record a Teams Meeting (Even If You're Not the Organizer)
Record a Microsoft Teams meeting as organizer or attendee, on Mac, Windows, web or phone. Find and download the file, and fix a missing Record button.
Updated October 23, 2026
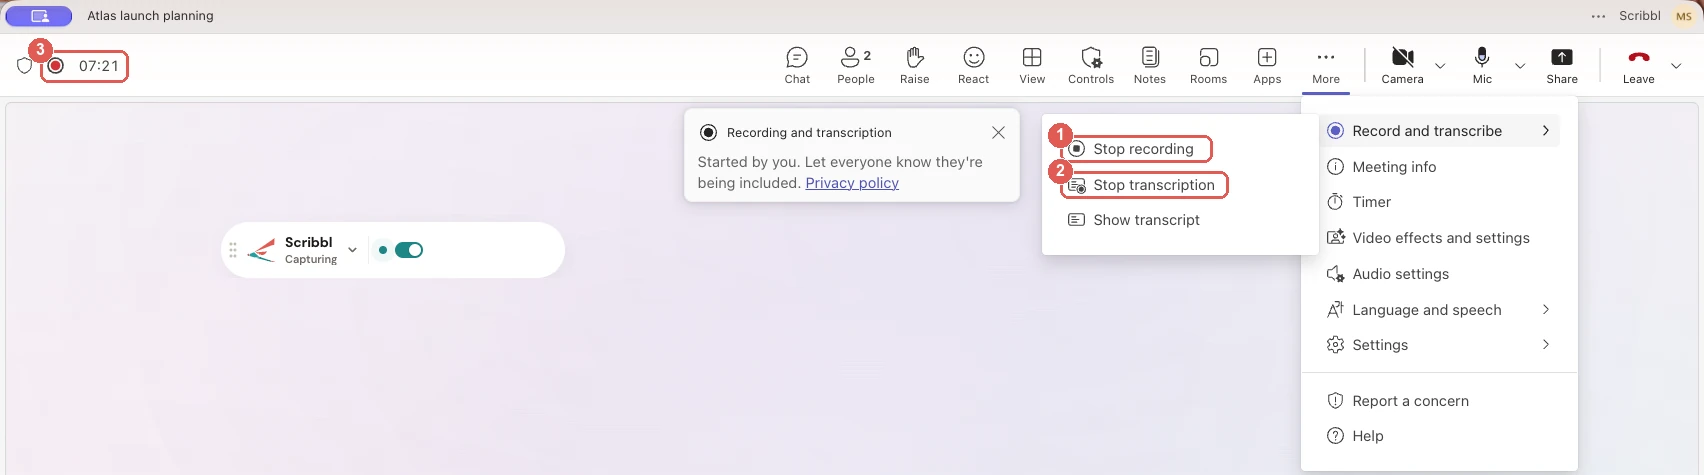
To record a Teams meeting, click More in the meeting controls, then Record and transcribe, then Start recording, and confirm. Teams shows a red recording dot next to the meeting timer, and when the meeting ends the recording appears in the meeting chat and is saved to the organizer's OneDrive.
That works only if you're signed in with an account from the organizer's organization, your license includes recording, and your admin allows it. Guests, people from other companies and free Teams users can't use Teams' recorder. If that's you, or you'd rather not press Record at all, Scribbl Desktop, our Microsoft Teams AI note taker, records the Teams meeting from your own Mac or Windows computer with nothing joining the call, and gives you the video, a transcript with speaker names and AI notes, on the free plan too. Get Scribbl Desktop or read how it works.
Everything below was tested on October 6, 2026, in Microsoft Teams for Mac, on a Microsoft 365 Business Premium work account, with a second person who joined from a browser without signing in. Microsoft's help page now shortens the menu path to More actions › Record; it's the same place in the meeting controls.
Can you record this Teams meeting?
| Who you are | Teams' Record button | Scribbl Desktop |
|---|---|---|
| Organizer, work or school account with recording allowed | Yes | Yes |
| Someone from the organizer's organization | Yes, if your admin allows it | Yes |
| Guest, from another company, or not signed in | No | Yes, in the Teams app |
| Free Teams for personal use | No | Yes, in the Teams app |
| Microsoft 365 Personal, Family or Premium | Yes | Yes |
Teams' rules come from Microsoft's help pages, checked October 23, 2026. Scribbl Desktop records the Teams meeting on your own computer, so it doesn't depend on your Teams role or license. Whichever you use, tell everyone you're recording.
Can't use the Record button? Do it with Scribbl
- 1
Add Scribbl Desktop
Install it on your Mac (Apple silicon) or Windows computer. No Teams license with recording, no admin setting, no organizer role needed.
- 2
Join the Teams meeting as usual
Scribbl starts on its own when the meeting begins, and nothing joins the call, so there's nothing for the lobby to hold. Tell everyone at the start that you're recording.
- 3
Open the notes when it ends
The video recording, a transcript with speaker names, AI notes and action items are in your Scribbl account, with no OneDrive file that expires.
Get Scribbl Desktop, or follow Teams' own steps below if you can use its Record button.
How to record a Teams meeting on Mac or Windows
Step 1: Join the meeting in Teams
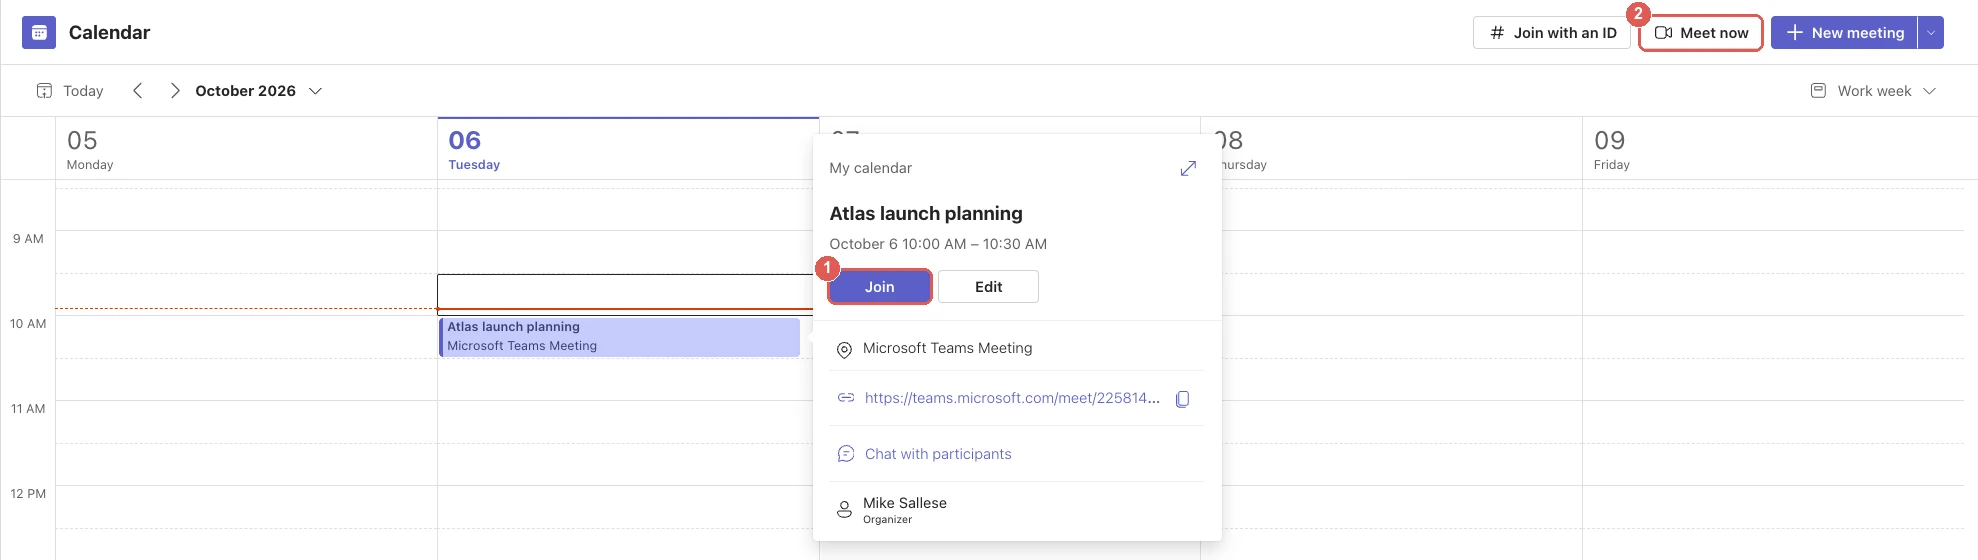
Open the Teams app and join the meeting from your Calendar or the meeting invite. In the calendar, click the meeting and then Join. Teams shows a screen where you can turn your camera on or off and pick a microphone and speaker under Computer audio; click Join now. Teams on the web, in a browser, works the same way. You don't need to be the organizer, but you do need to be signed in with an account from the organizer's organization; more on that below.
Step 2: Click More, then Record and transcribe, then Start recording
Record isn't a button on the toolbar. It's under More, the ··· button in the meeting controls, between Apps and Camera (Microsoft's help pages call it More actions). Hover over Record and transcribe and choose Start recording.

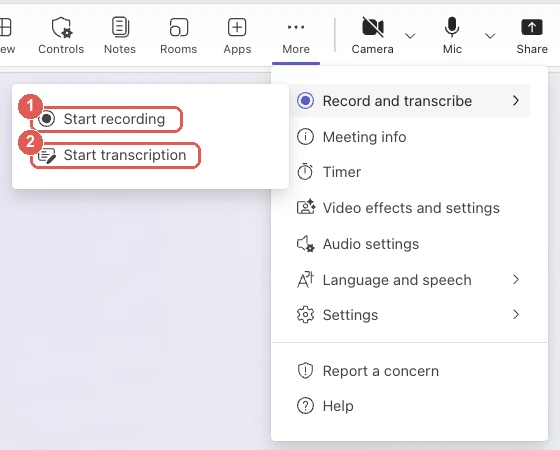
Starting a recording also starts the transcript: Microsoft says transcription starts automatically when you record, and the dialog in the next step is titled Start recording and transcription. If you only want the transcript, choose Start transcription instead.
Step 3: Confirm
Teams opens a dialog titled Start recording and transcription. It asks you to pick the Spoken language so the features that process audio get it right; ours was set to English (US). Click Confirm.
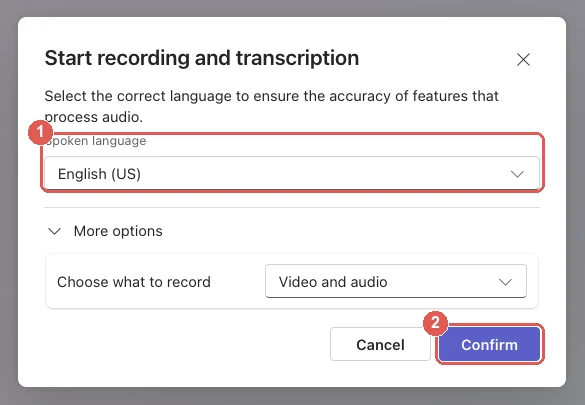
The same dialog has More options, which opens Choose what to record, set to Video and audio. Microsoft's help page says you can switch it to Audio only to record just the sound.
Step 4: Check that Teams is recording
After Confirm, Teams shows "Starting recording and transcription..." for a moment. Then a red dot appears next to the meeting timer, at the top left of the meeting window. The person who started the recording sees a notice: "Recording and transcription. Started by you. Let everyone know they're being included," with a link to the privacy policy. Microsoft says everyone in the meeting gets a notification in their Teams app, on a computer, in a browser or on a phone; in our test the guest, in a browser, saw the red dot next to their timer. Only one person can record a meeting at a time.

Step 5: Stop recording
Click More › Record and transcribe and choose:
- Stop recording to stop both the recording and the transcript. Teams asks Stop recording and transcription?; click Stop.
- Stop transcription to stop only the transcript. The recording keeps going.
While Teams records, the same menu also has Show transcript, which opens the transcript during the meeting. The image at the top of this page shows that menu in our test.
To end the meeting for everyone, click the arrow next to Leave, then End meeting. Teams asks End the meeting?; click End.
You don't have to stop it yourself. Microsoft's rules:
- The recording keeps going if the person who started it leaves the meeting.
- It stops on its own once everyone leaves.
- If someone forgets to leave, Teams ends the recording and starts a new one every four hours until the last person leaves.
Step 6: Find the recording in the meeting chat
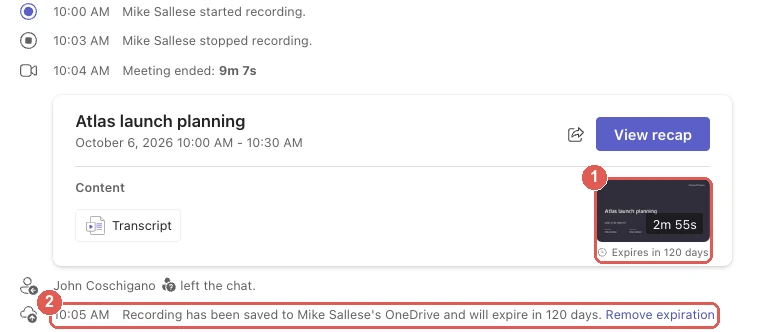
After the meeting, Teams posts the recording in the meeting chat. In our test it showed Saving... for about a minute after the meeting ended. The chat also logs who started and stopped the recording, at what time, and how long the meeting lasted. Below that, a recap card holds a View recap button, a Transcript chip and the recording itself, labeled Expires in 120 days. A last line says the recording has been saved to the organizer's OneDrive, with a Remove expiration link. For a channel meeting, Microsoft says the recording is posted in the channel conversation.
How to record a Teams meeting automatically
To have Teams start recording on its own, set it when you schedule the meeting. In the Teams calendar, open the New meeting form, go to Options and turn on Record and transcribe automatically; it was off by default on our Business Premium account. The same switch is in the Meeting options dialog (More options in the form), under Recording & transcription. The same license and admin rules apply as for the Record button.
Where do Teams recordings go?
| Meeting type | Where the recording is saved |
|---|---|
| Scheduled or Meet now meeting | The organizer's OneDrive, in My files › Recordings, even if the organizer didn't attend |
| Channel meeting | The channel's SharePoint site, in the Recordings folder (the channel's Files tab) |
| 1:1 or group call | The OneDrive of the person who clicked Record |
| Teams for personal use | In the meeting chat, for 30 days |
Three ways to get to it:
- From the meeting chat: open Chat, select the meeting's chat, then Recap (or click View recap on the recap card). The Shared tab, where older guides send you, said "No content shared in this chat" in our test.
- From your calendar: open Calendar, select the past meeting, then Recap.
- From OneDrive (organizer only): open OneDrive on the web and go to My files › Recordings. Our file was named Atlas launch planning-20261006_100044-Meeting Recording.mp4: the meeting name, the date and start time, then "Meeting Recording".
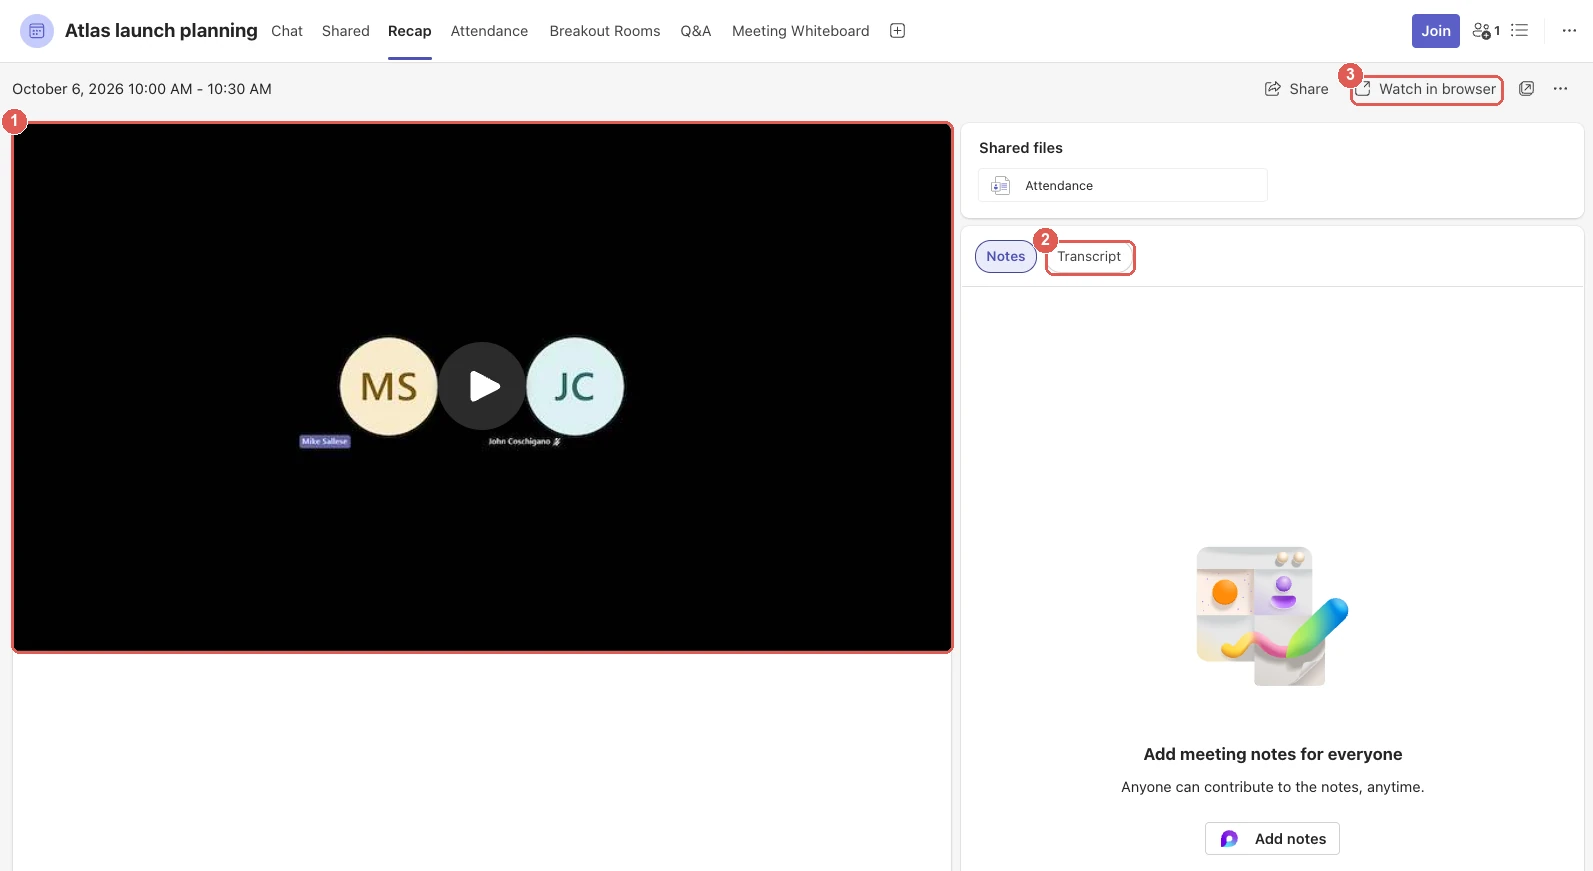
The Recap tab plays the recording, with Notes and Transcript tabs beside it and the attendance file under Shared files. At its top right are Share, Watch in browser and ···, but no Download; downloading happens in the web player, below.

Who can see it: everyone invited from the organizer's organization can watch it. Guests and people from other companies can only watch it if it's shared with them directly. A one-hour recording is about 400 MB, and it counts against the organizer's OneDrive storage. If the organizer has no OneDrive, or it's full, Teams holds the recording for 21 days and the organizer has to download it before it's deleted.
How to download a Teams recording
Teams' Recap tab has no Download button, and in our test the meeting chat's Shared tab no longer listed the recording. The download is in the web player instead:
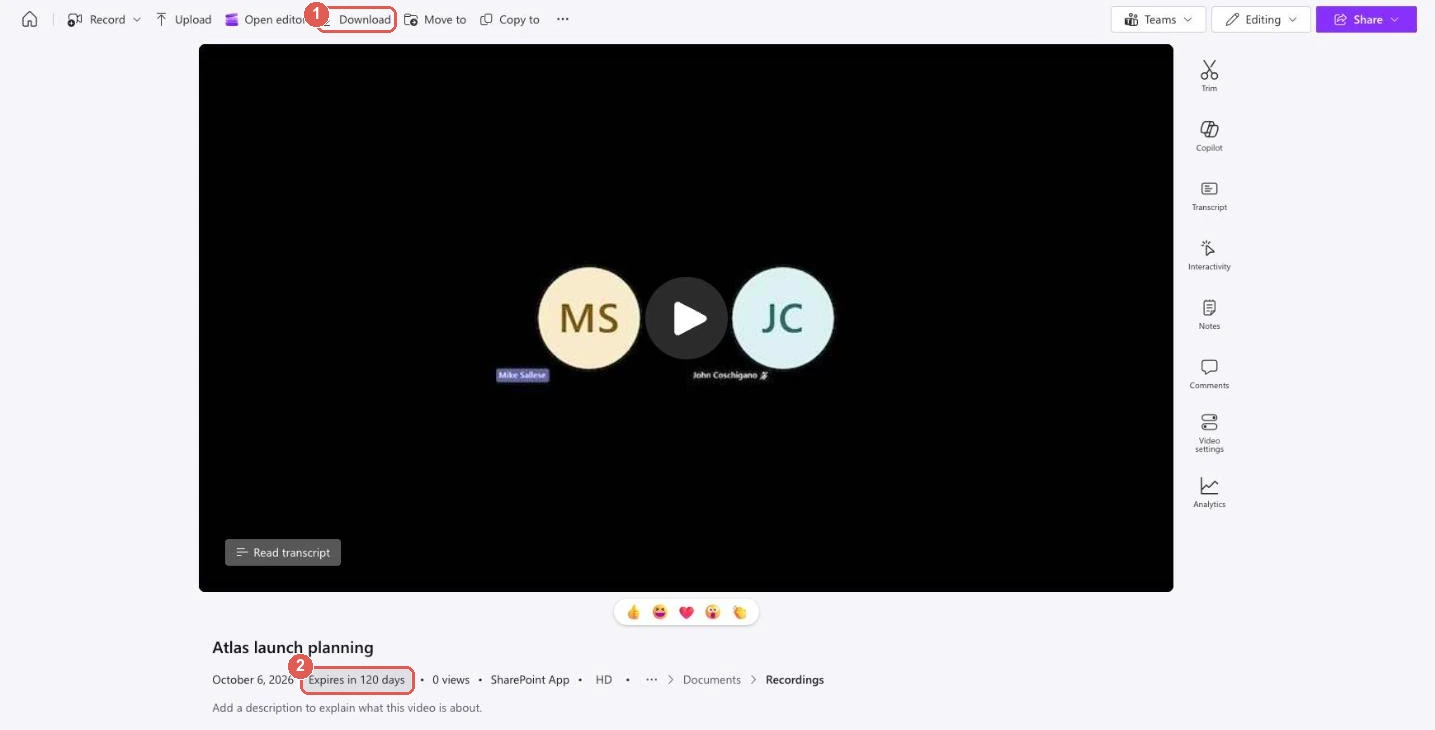
- Open the meeting chat, select Recap, and click Watch in browser at the top right. Or, as the organizer, open the MP4 in OneDrive under My files › Recordings.
- The recording opens in your browser. Click Download in the toolbar above the video.
The same toolbar has Move to and Copy to for putting the file somewhere else.
Microsoft's help page says only the organizer can download a meeting recording by default; co-organizers can edit and share it, and everyone else invited from the organizer's organization can watch it. For a channel meeting, channel members can download it unless an admin has set channel recordings to view only. On a personal account, Microsoft says to select Download below the recording's date and time in the meeting chat.
How long Teams recordings last, and how to stop them expiring
Teams recordings don't stay forever:
- Work and school accounts: recordings and transcripts expire after 120 days by default. Admins can change this, but the change only applies to new recordings. Education A1 accounts are limited to 30 days.
- Teams for personal use: recordings last 30 days. Download the file to keep it.
On a work or school account, the organizer and co-organizers can change the date for one recording, or remove it:
- Open the recording in the web player: Recap › Watch in browser in the meeting chat, or the MP4 in OneDrive.
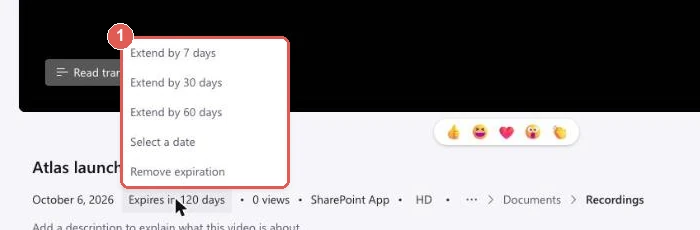
- Under the video, click Expires in 120 days.
- Choose Extend by 7 days, Extend by 30 days, Extend by 60 days, Select a date or Remove expiration.
The meeting chat has a shortcut too: the line saying the recording was saved to OneDrive ends with a Remove expiration link.
When a recording expires, the owner gets an email and the file moves to the recycle bin of the OneDrive or SharePoint site it was saved in. The owner then has up to 90 days to restore it. Watching a recording doesn't change its expiration date.
Who can record a Teams meeting?
On a work or school account, you can start or stop a recording if all of these are true:
- You have one of these licenses: Office 365 Enterprise E1, E3, E5 or F3, A1, A3 or A5, or Microsoft 365 Business, Business Premium or Business Essentials.
- Your admin has turned recording on for you, and for the organizer.
- You're not a guest, and not from another organization.
| Who you are in the meeting | Can start recording? | Can stop recording? |
|---|---|---|
| Organizer | Yes | Yes |
| Someone from the organizer's organization | Yes | Yes |
| Someone from another organization | No | No |
| Guest | No | No |
| Joined without signing in | No | No |
Admins turn recording on or off in the Teams admin center, under Meetings › Meeting policies. Both the organizer and the person recording need it turned on. The same Recording & transcription section sets transcription and how long recordings last. In our test organization, the Global (Org-wide default) policy came with recording, transcription and automatic expiration all on, and Require participant agreement for recording, transcription, and Copilot off.
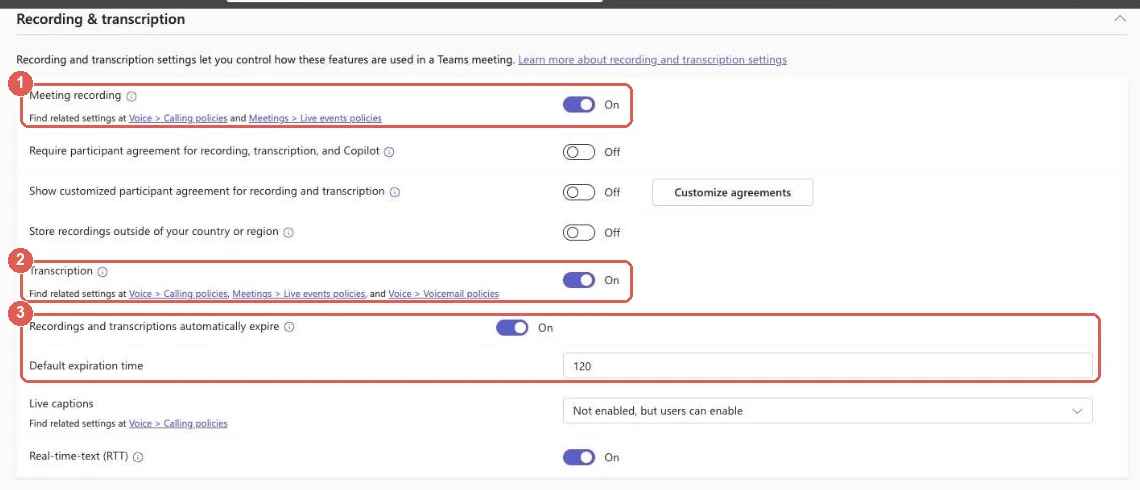
The organizer doesn't need to be in the meeting. With Teams Premium or a Copilot license, the organizer can also choose who can record, under Who can record and transcribe: Organizers and co-organizers, Organizers, co-organizers, and presenters, or No one. Without one of those licenses that choice isn't there. On our Business Premium account, the New meeting form's Options panel had Record and transcribe automatically, off by default, and More options opened a Meeting options dialog whose Recording & transcription section held only that one setting.
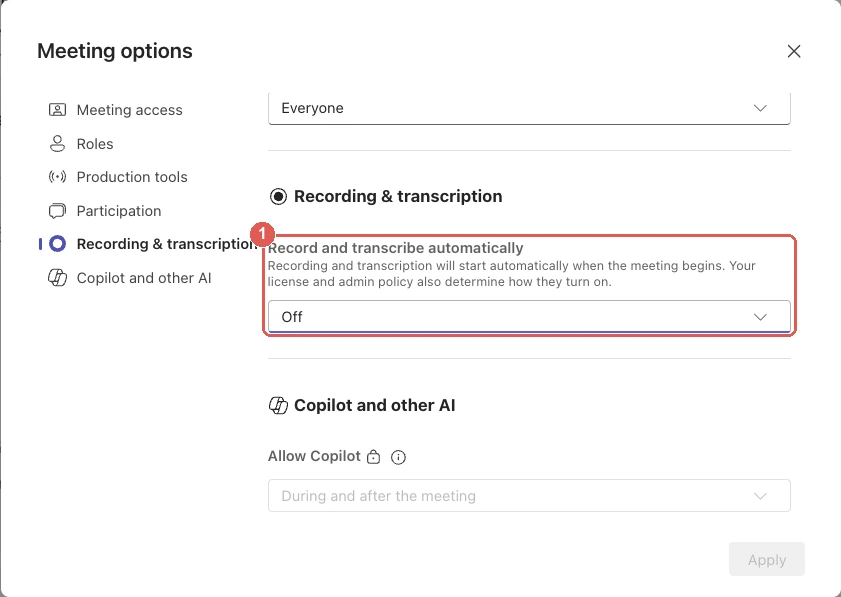
One more switch matters: if the organizer sets Copilot to Off in the meeting options, recording and transcription are turned off too.
How to record a Teams meeting if you're not the organizer
If you're in the organizer's organization
You can probably already record. Follow the steps above. If Start recording is unavailable, hover over it: Microsoft says Teams gives the reason, and the troubleshooting list has the fix for each message.
If you're a guest or from another company
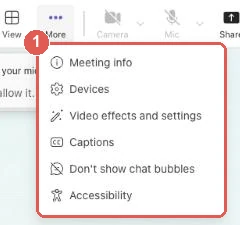
Teams' recorder isn't available to you. In our test, the person who joined from a browser without signing in didn't get a locked option; their More menu had no Record and transcribe at all, only Meeting info, Devices, Video effects and settings, Captions, Don't show chat bubbles and Accessibility. Ask the organizer, or someone from their organization, to record and share the recording with you afterwards.
Use your computer's screen recorder
Recorders built into your computer don't need anyone's permission in Teams, but they have limits:
- Mac: press Cmd + Shift + 5 and choose to record the screen or part of it. On macOS 27 or later, choose Include System Audio in Options so the other people's voices are recorded. On older versions the built-in recorder only records your microphone, so their voices come out faint or not at all unless you add extra audio software.
- Windows 11: the Snipping Tool has a record mode that can capture the screen with the computer's sound, and Win + Alt + R records the window you're in with the Xbox Game Bar.
You'll get a screen video and nothing else: no transcript, no notes, and a large file.
Use a desktop recorder that doesn't join the call
A desktop recording app records the Teams meeting in the Teams app on your own computer, so you don't need to be the organizer and nothing joins the call. Scribbl works this way: it gives you the video, a transcript with speaker names and AI notes, without you pressing Record. More on that below. To compare other tools, see meeting recording software.
Recording on free Microsoft Teams
The free version of Teams, which Microsoft calls Teams for personal use, doesn't include meeting recording. Microsoft's own comparison lists meeting recordings as No for free Teams, where meetings also end at 60 minutes.
Recording on a personal account needs Microsoft 365 Personal, Family or Premium. With one of those, according to Microsoft:
- Anyone in the meeting with one of those subscriptions can start or stop the recording. People without one, and people signed in with a work account, can't.
- Click More actions › Start recording on a computer, or tap More actions › Start recording on a phone.
- If the person who started the recording leaves, the recording stops. On work accounts it keeps going.
- The recording is saved in the meeting chat for 30 days, then it's gone. Select Download below the recording's date and time to keep a copy.
- Only the person who started the recording can delete it.
- Office 365 and Microsoft 365 work and school licenses
- Teams app on Mac and Windows, Teams on the web, phone app
- Saved to the organizer's OneDrive (SharePoint for channel meetings)
- Expires after 120 days by default; the organizer can remove the expiration
- Transcript, if your admin allows transcription
- The organizer and people from the organizer's organization
- Keeps recording if the person who started it leaves
- Microsoft 365 Personal, Family or Premium; free Teams can’t record
- Teams app on a computer or phone (Microsoft's guide doesn't cover the web)
- Saved in the meeting chat
- Deleted after 30 days; download it to keep it
- Microsoft's guide for personal accounts doesn't mention transcripts
- Anyone in the meeting with one of those subscriptions
- Stops if the person who started it leaves
How to record a Teams meeting on iPhone or Android
The Teams phone app records the same way, with the same rules: you need a license that includes recording, and guests can't record. Microsoft's steps:
- In the meeting, tap More options (···).
- Tap Start recording. Everyone in the meeting is notified.
- To stop, tap More options › Stop recording.
The recording is processed, saved to OneDrive or SharePoint, and posted in the meeting chat. You can also find it in the past meeting's details in your Teams calendar. On a personal account, the steps are More actions › Start recording, and you can download the recording to your phone from the meeting chat.
How to record in Teams on the web
Teams on the web, in a browser, uses the same steps as the desktop app: More › Record and transcribe › Start recording. Recording isn't on Microsoft's list of desktop features that are missing from the web version, and in our test the person who joined from a browser saw the red recording dot while Teams recorded. The same license and organization rules apply, so someone who joins from a browser without signing in won't have Record and transcribe at all.
How to get a transcript of a Teams meeting
- Record the meeting: transcription starts automatically when you start recording.
- Transcript only: click More › Record and transcribe › Start transcription, confirm the language everyone is speaking, then click Confirm. Microsoft says everyone sees a notification that the meeting is being transcribed.
The transcript shows each speaker's name and a time stamp. During the meeting, open it with More › Record and transcribe › Show transcript.
After the meeting:
- Open Chat and select the meeting's chat.
- Select Recap, then the Transcript tab next to Notes.
- Or open the recording in the web player (Watch in browser) and click Read transcript under the video, or Transcript in the panel on the right.
Microsoft says organizers and co-organizers can download the transcript as a .docx or .vtt file by default. People from the organizer's organization can read it after the meeting; people from other organizations can follow it live but can't open it afterwards. In the phone app you can read the transcript after the meeting, but the live transcript is only on the desktop app. Your admin has to allow transcription; it was on by default in our test organization's meeting policy. If the meeting was recorded with transcription off, there's no transcript. For other ways, see how to transcribe a meeting.
AI notes in Teams need extra licenses. Teams' intelligent recap, with AI notes, suggested tasks and a speaker timeline, needs Teams Premium or a Microsoft Copilot license, and the meeting has to be transcribed. Copilot in Teams meetings needs a Copilot add-on license. An AI notetaker such as Scribbl writes the transcript and notes without either. More in AI meeting notes in Microsoft Teams.
AI notetaker bots in Teams meetings in 2026
Many AI notetakers join your meeting as an extra participant. Microsoft has been changing how Teams treats them:
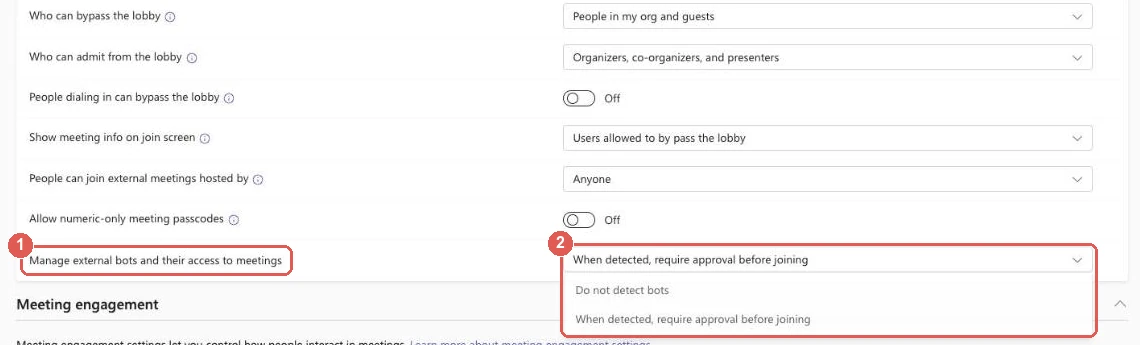
- Bots wait in the lobby. Teams now detects external bots when they try to join, marks them in the lobby and keeps them there until the organizer admits them, even when the meeting's lobby settings would let them straight in. It's the default setting, called When detected, require approval before joining. Microsoft's roadmap dates this to May 2026 (roadmap 558107), and the admin setting is described on Microsoft Learn.
- Admins can now block them all. Microsoft is adding an admin option that blocks every identified external bot from joining meetings, with no lobby step (roadmap 566201). Its Message Center notice MC1459141, last updated September 9, 2026, puts general availability from early October to late October 2026, and the option is off by default. On October 6, 2026, it hadn't reached our test organization: the admin setting still had only two options, Do not detect bots and When detected, require approval before joining.
- Detection isn't perfect. Microsoft says some bots may not be detected, and some people may be marked as bots by mistake. The organizer can admit them from the lobby and tick This isn't a bot.
That last point happened in our test. John Coschigano joined from a web browser without signing in, and Teams held him in the lobby under Waiting in lobby › Suspected threats, with an Unverified label. When the organizer went to admit him, Teams opened a dialog titled Admit this unverified bot?. It warned that external bots might record or transcribe the meeting and cause sensitive information to leave the organization, and asked the organizer to admit the bot only if they know and trust it. The dialog had a This isn't a bot checkbox and Admit and Deny buttons.
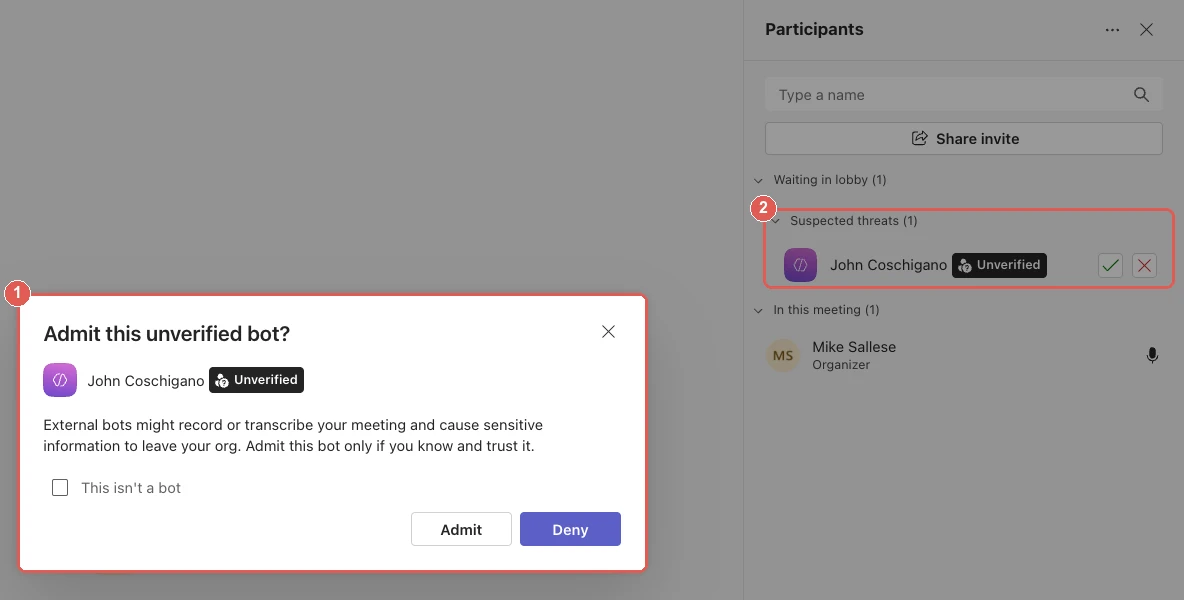
What this means for you: if your notetaker joins the call as a participant, it may wait in the lobby until someone lets it in, or be turned away by the other company's admin. A recorder on your own computer doesn't join the call, so there's nothing for the lobby to hold.
Record Teams without pressing Record: Scribbl
If you record Teams meetings regularly, the steps above come with a lot of conditions: the right license, the right role, an admin who allows it, a file in someone else's OneDrive that expires, and then an hour of video to scrub through to find the one thing someone said.
Scribbl Desktop records your meetings in the Teams app from your own computer, on a Mac with Apple Silicon or a Windows PC. In our test it started capturing on its own when the Teams meeting began: its small window showed Starting, then Capturing, with nothing to click.
While only Scribbl was recording, Teams showed the other people no notice at all: the guest's window had no recording dot and no message. So tell everyone at the start of the meeting that you're recording.

What you get after every meeting:
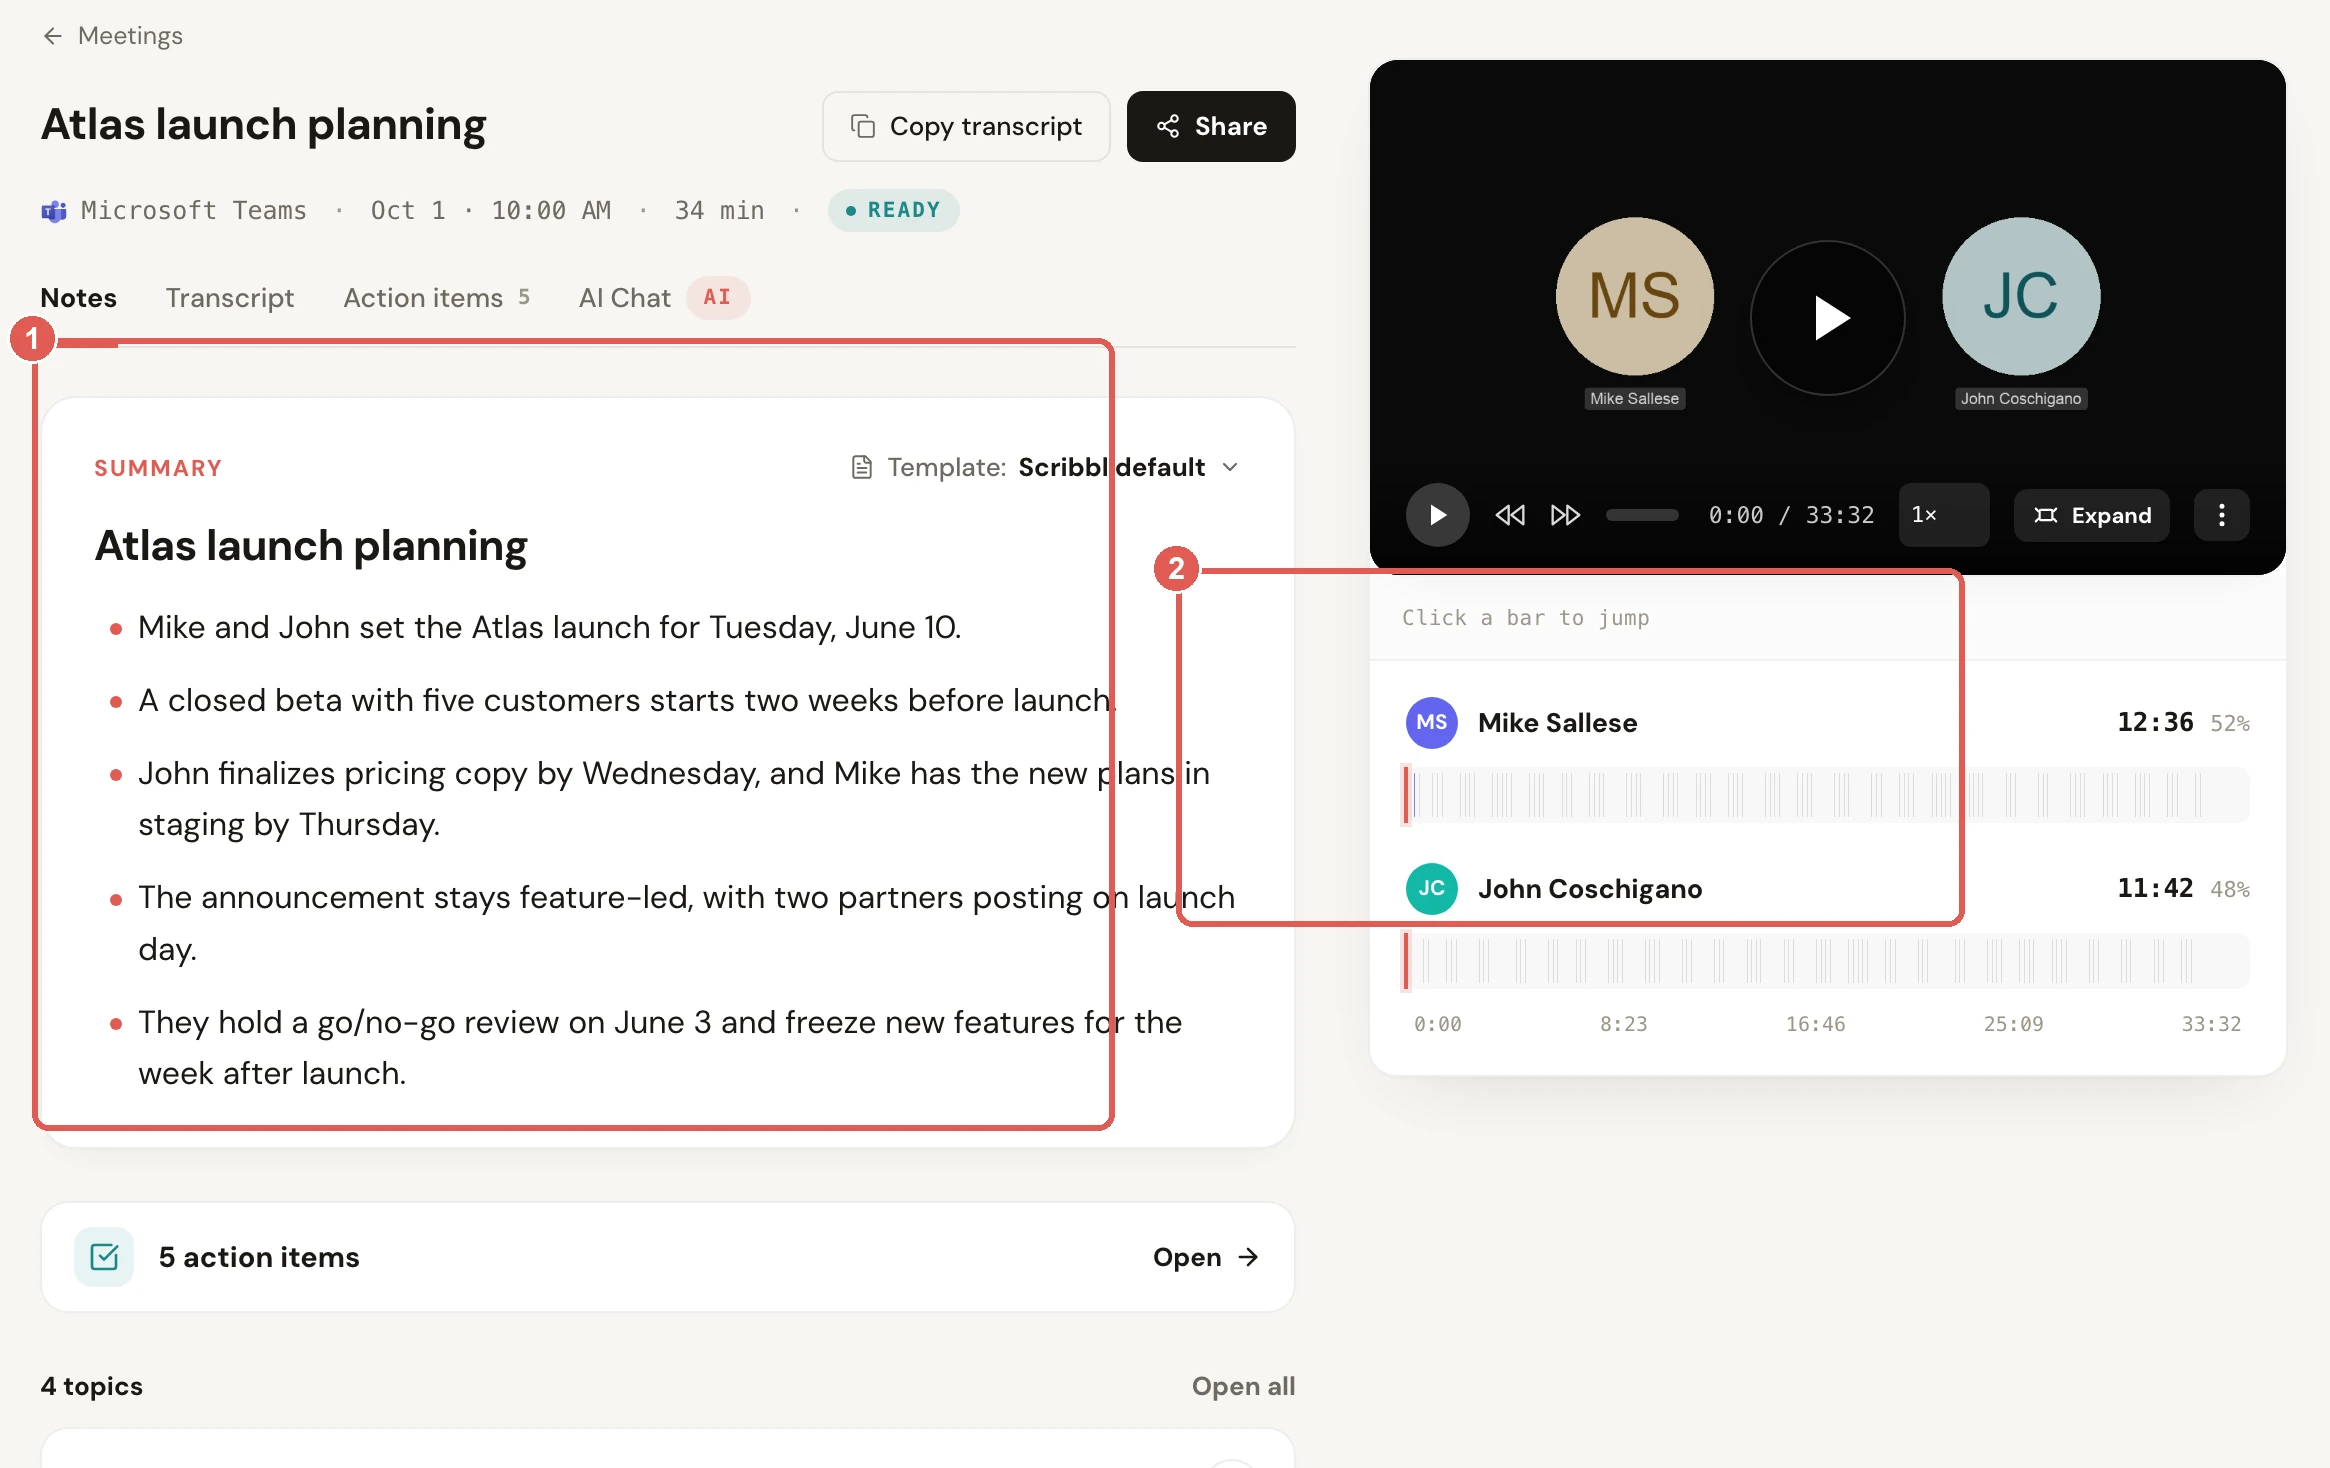
- The full video, with a timeline of who spoke when.
- A searchable transcript with speaker names and timestamps.
- AI notes: a summary, decisions and action items.
- Automations that do the follow-up: draft the email (copy it or open it in Gmail; it never sends by itself), post to Slack or Microsoft Teams, or log notes in HubSpot or Pipedrive. They ask before they change anything by default.
- Your Google Meet and Zoom meetings in the same place, sorted by Smart Collections.
- Ask about past meetings. On Pro, connect Scribbl to ChatGPT or Claude and ask what was decided in last week's Teams call.
And what you don't need: no bot joins the call, so there's nothing waiting in the lobby, and you don't need to be the organizer or have a Teams license that includes recording. Recordings are private by default, and Scribbl doesn't use your meetings to train AI for anyone other than you.
What it needs: a Mac with Apple silicon (M1 or newer) or a 64-bit Windows PC. The free plan includes Google Meet, Zoom and Microsoft Teams, with 10 meetings a month. Pro is $13 per user per month billed annually, or $20 monthly (pricing). More on Teams notes on the Microsoft Teams AI note taker page.
Get Scribbl for TeamsTroubleshooting: when Teams recording doesn't work
If Record and transcribe is missing from the More menu, start with the first item. If Start recording is there but unavailable, Microsoft says hovering over it shows one of the messages below.
There's no Record and transcribe in the More menu
In our test, a person who joined from a browser without signing in had no Record and transcribe at all. If you're in the organizer's organization, leave and join again signed in with your work account. Otherwise, ask someone from the organizer's organization to record and share the recording after the meeting.
Only people in this org can start recording
You're signed in as a guest or from another organization. Ask someone from the organizer's organization to record and share the recording after the meeting.
Unavailable for this meeting due to organization policy
Your Teams admin hasn't turned on recording for you, or just changed it and the change hasn't reached you yet. Ask your admin to turn on Meeting recording in your meeting policy, then give it some time.
Unavailable in this meeting
The organizer isn't allowed to record, so no one in the meeting can. Ask the admin to allow recording for the organizer.
Only meeting organizer and co-organizer can start recording
The organizer, using Teams Premium, limited recording to organizers and co-organizers. Ask them to change Who can record and transcribe to include presenters, or to make you a co-organizer.
Only meeting organizers and presenters can start recording
You're an attendee, not a presenter. Ask the organizer to make you a presenter.
Unavailable because the meeting organizer has disabled recording
The organizer set Who can record and transcribe to No one. Only they can change it.
Unavailable because Copilot is turned off for this meeting
The organizer set Copilot to Off in the meeting options, which turns off recording and transcription too. Ask the organizer or a co-organizer to allow Copilot.
Recording has already started
A recording takes a few seconds to start, and the button is unavailable until it does. Only one person can record a meeting at a time.
There's no Start recording on my personal account
Free Teams doesn't include recording. It needs Microsoft 365 Personal, Family or Premium.
The recording isn't in the chat
Teams saves the recording after it stops; ours showed Saving... for about a minute. Give it a few minutes, then check the meeting chat's Recap tab, or OneDrive under My files › Recordings. Don't look for it on the Shared tab; it wasn't listed there in our test. If the organizer has no OneDrive or it's full, Teams shows an error and holds the recording for 21 days; the organizer has to download it in that time.
The recording disappeared
It probably expired. The owner, usually the organizer, can restore it from the OneDrive recycle bin for up to 90 days (the channel's SharePoint recycle bin for channel meetings). On a personal account, recordings are gone after 30 days.
The recording stopped when I left
That happens on personal accounts: the recording stops when the person who started it leaves. On work and school accounts it keeps going until everyone leaves.
Do you need permission to record a Teams meeting?
When you record with Teams, Teams tells people. The person who started the recording sees "Let everyone know they're being included," and in our test the guest saw a red recording dot next to the meeting timer. Microsoft says everyone in the meeting gets a notification in their Teams app as soon as recording starts. An organization can go further and require everyone to agree first, with the admin setting Require participant agreement for recording, transcription, and Copilot. With it on, everyone except the person recording is muted, with cameras and screen sharing off, until they answer Yes. Anyone who answers No can only watch. The setting is off by default, and it was off in our test organization.

Recorders outside Teams, like your computer's screen recorder or a desktop recording app, don't trigger that dot or notice; in our test, the guest saw neither while only Scribbl was recording. Whether you need consent then depends on where you and the other people are. Microsoft's own help page says the same: depending on your region, you may need everyone's permission before you record them. In the US, federal law and most states require only one person on the call to agree, which can be you. See the one-party consent states. Some states require everyone's agreement, including California, Florida, Illinois, Maryland, Massachusetts, Pennsylvania and Washington. Many other countries have their own rules. For more, see is it illegal to record a conversation.
The simple rule that covers you everywhere: say you're recording at the start of the meeting. This isn't legal advice; if it matters, check the rules where you and your participants are.
To record every Teams meeting you're in, organizer or not, with the video, a transcript and AI notes waiting when it ends: the free plan includes Google Meet, Zoom and Microsoft Teams, with 10 meetings a month. Get Scribbl Desktop.
FAQ
Can I record a Teams meeting for free?
Not on the free version of Teams. Microsoft lists meeting recordings as not included in Teams for personal use, where meetings also end at 60 minutes. Recording comes with Microsoft 365 Personal, Family or Premium on a personal account, and with most work and school licenses, if your admin allows it. Your computer's screen recorder, or a desktop recording app like Scribbl, doesn't use Teams' recording feature at all.
Can I record a Teams meeting if I'm not the organizer?
Yes, if you're in the organizer's organization and your admin allows recording; the organizer doesn't even need to be there. Guests, people from other companies and people who joined without signing in can't use Teams' recorder. They can ask someone from the organizer's organization to record, or use a screen recorder or a desktop recording app such as Scribbl. Either way, tell people you're recording.
How do I record a Teams meeting as a guest?
Teams' own recorder isn't available to guests, people from other companies or anyone who joined without signing in. Ask someone from the organizer's organization to record and share it with you, or use Scribbl Desktop, which records the meeting in the Teams app on your own Mac or Windows computer with nothing joining the call, and gives you the video, a transcript with speaker names and AI notes. Tell everyone you're recording.
Why can't I record a meeting in Teams?
If Record and transcribe isn't in the More menu, you probably joined as a guest or without signing in; that's what we saw in our test. If Start recording is there but unavailable, hover over it for the reason: usually you're from another organization, your admin turned recording off, the organizer limited who can record, the organizer turned Copilot off, or you're on free Teams. The troubleshooting list covers each case.
Where do Teams recordings go?
To the organizer's OneDrive, in My files › Recordings, for regular meetings; to the channel's SharePoint site for channel meetings; and to the OneDrive of whoever clicked Record for calls. In Teams, find them in the meeting chat or on its Recap tab.
Does Teams notify people when you record?
Yes. A red recording dot appears next to the meeting timer, the person recording gets a notice, and Microsoft says everyone gets a notification. Admins can also require everyone's agreement. Recorders outside Teams don't trigger any of it, so tell people yourself.
Can you record a Teams meeting on your phone?
Yes. Tap More options, then Start recording. You need the same license as on a computer, and guests can't record.
Can you record a Teams meeting for yourself?
Yes. Click Meet now in the Teams calendar to start a meeting with only you in it, share your screen if you need to, then click More › Record and transcribe › Start recording. The recording goes to your own OneDrive.
How long can you record a Teams meeting?
Until everyone leaves. If someone forgets to leave, Teams ends the recording and starts a new one every four hours. Microsoft 365 Personal and Family meetings can run up to 30 hours; free Teams meetings end at 60 minutes and can't be recorded.
Do Teams recordings expire?
Yes. Work and school recordings expire after 120 days by default (30 days on education A1 accounts), and personal recordings after 30 days. The organizer can click Expires in 120 days under the video in the web player to extend it or choose Remove expiration.
How do I download a Teams recording?
In the meeting chat, select Recap, click Watch in browser, then click Download in the web player's toolbar. You can also open the MP4 from OneDrive. Recap itself has no Download button, and in our test the Shared tab didn't list the recording. Microsoft says only the organizer can download it by default.
How do I get a transcript of a Teams meeting?
Recording a meeting starts transcription automatically, and you can also start it on its own with More, Record and transcribe, Start transcription. After the meeting, open the meeting chat, select Recap, then Transcript to read it. Microsoft says organizers and co-organizers can download it as a .docx or .vtt file. An AI notetaker such as Scribbl writes the transcript and notes for you without anyone starting transcription.
How do I record a Teams meeting automatically?
When you schedule the meeting in the Teams calendar, open Options in the new meeting form and turn on Record and transcribe automatically; it was off by default on our Business Premium account. Teams then starts recording when the meeting starts. Scribbl Desktop also starts on its own when a Teams meeting begins, with nothing to click and nothing joining the call.
Is Scribbl free for Teams meetings?
Yes. The free plan includes Google Meet, Zoom and Microsoft Teams, with 10 meetings a month, and you don't need to be the organizer or have a Teams license that includes recording. Pro is $13 per user per month billed annually, or $20 monthly. Get Scribbl Desktop for Mac (Apple silicon) or Windows at scribbl.co/desktop.
Sources
Microsoft's recording help page was checked again on October 23, 2026, and the other pages below on October 19, 2026. Every screenshot in this guide, and every step on a computer, comes from real meetings in Microsoft Teams for Mac on October 6, 2026, recorded on a Microsoft 365 Business Premium account with a second participant who joined from a browser without signing in. The steps for phones and personal accounts, plan limits and settings come from Microsoft's own pages. Teams moves buttons between versions; if yours looks different, look for the same names under More.
- Microsoft Support: Start, stop, and find meeting recordings in Microsoft Teams (who can record, licenses, notifications, the four-hour rule, phone steps)
- Microsoft Support: Play, share, and download meeting recordings in Microsoft Teams
- Microsoft Support: I can't record a meeting in Microsoft Teams (every message shown when Start recording is unavailable)
- Microsoft Support: Start, stop, and download live transcripts in Microsoft Teams meetings
- Microsoft Support: Manage meeting and call recordings in Microsoft Teams (free) (Microsoft 365 Personal, Family or Premium; 30 days; stops when the person recording leaves)
- Microsoft Support: Learn more about subscriptions for Microsoft Teams (free) (60-minute free meetings, no recordings on free)
- Microsoft Learn: Manage Teams recording policies for meetings and events (external participants can't record; Copilot off turns recording off)
- Microsoft Learn: Teams meeting recording and transcript storage and permissions in OneDrive and SharePoint (where recordings go, 400 MB an hour, 21 days without OneDrive)
- Microsoft Learn: Manage Teams recording expiration policy (120 days by default, 30 days for A1)
- Microsoft Learn: Participant agreement for recording and transcription
- Microsoft Learn: Manage external bots and their access to meetings
- Microsoft 365 roadmap: 558107 and 566201; Message Center MC1459141 (block all identified external bots, general availability early to late October 2026)
- Scribbl: pricing and Scribbl Desktop
Try Scribbl
Let your meetings take their own notes.
Scribbl's desktop app records, transcribes, and summarizes your Teams meetings from your own computer. No bot joins the call and you don't need to be the host. Free forever for individuals.
Get Scribbl for Teams · It's free